Introduction
Gumbi simplifies the steps needed to build a Gaussian Process model from tabular data. It takes care of shaping, transforming, and standardizing data as necessary while applying best practices and sensible defaults to the construction of the GP model itself. Taking inspiration from popular packages such as Bambi and Seaborn, Gumbi’s aim is to allow quick iteration on both model structure and prediction visualization. Gumbi is primarily designed with the experimental scientist in mind, and enabling easy implementation of Bayesian Optimization into laboratory workflows. Gumbi is primarily built on top of Pymc, with a Botorch backend provided for acceleration and Bayesian Optimization.
Quickstart
Read in some data and store it as a Gumbi DataSet:
[2]:
import gumbi as gmb
import seaborn as sns
cars = sns.load_dataset('mpg').dropna()
ds = gmb.DataSet(cars, outputs=['mpg', 'acceleration'], log_vars=['mpg', 'acceleration', 'horsepower'])
Create a Gumbi GP object and fit a model that predicts mpg from horsepower:
[3]:
gp = gmb.GP(ds)
gp.fit(outputs=['mpg'], continuous_dims=['horsepower']);
/home/john/projects/gumbi/gumbi/utils/gp_utils.py:64: FutureWarning: find_constrained_prior is deprecated and will be removed in a future version. Please use maxent function from PreliZ. https://preliz.readthedocs.io/en/latest/api_reference.html#preliz.unidimensional.maxent
  params_ls = pm.find_constrained_prior(
/home/john/mambaforge/envs/gumbi-test/lib/python3.11/site-packages/pytensor/link/c/cmodule.py:2959: UserWarning: PyTensor could not link to a BLAS installation. Operations that might benefit from BLAS will be severely degraded.
This usually happens when PyTensor is installed via pip. We recommend it be installed via conda/mamba/pixi instead.
Alternatively, you can use an experimental backend such as Numba or JAX that perform their own BLAS optimizations, by setting `pytensor.config.mode == 'NUMBA'` or passing `mode='NUMBA'` when compiling a PyTensor function.
For more options and details see https://pytensor.readthedocs.io/en/latest/troubleshooting.html#how-do-i-configure-test-my-blas-library
  warnings.warn(
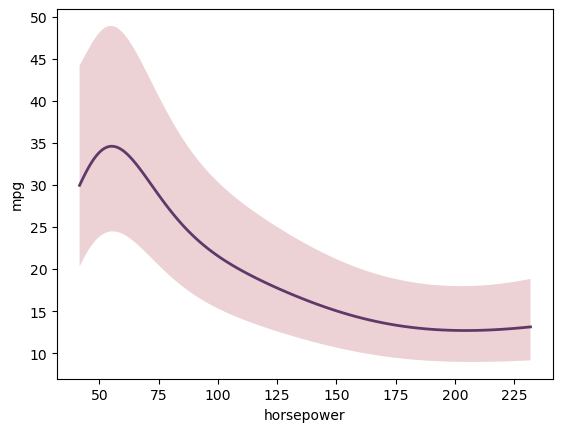
Make predictions and plot!
[4]:
X = gp.prepare_grid()
y = gp.predict_grid()
gmb.ParrayPlotter(X, y).plot()
[4]:
<Axes: xlabel='horsepower', ylabel='mpg'>
More complex GPs are also possible, such as correlated multi-input and multi-output systems, demonstrated in the example notebooks.
Installation
Via pip
pip install gumbi
Bleeding edge
pip install git+git://github.com/JohnGoertz/Gumbi.git@develop
Local development
Clone the repo and navigate to the new directory
git clone https://gitlab.com/JohnGoertz/gumbi gumbicd gumbi
Create a new conda environment using mamba
conda install mambamamba install -f gumbi_env.yaml
Install
gumbiviapipin editable/development modeFrom within the
gumbirepopip install --editable ./
To update the
gumbimoduleFrom within the
gumbirepogit pull